Simple electrical troubleshooting skills could save your home. Electrical faults trigger more than 28,000 house fires across the U.S. every year.
Your home sends clear warning signals that shouldn’t go unnoticed. These include flickering lights, tripping circuit breakers, buzzing sounds, burning smells, and hot outlets. You don’t always need professional help to troubleshoot home electrical problems. Simple electrical troubleshooting steps can identify minor issues before they become dangerous situations.
A systematic process of elimination helps determine what’s causing electrical problems. This methodical approach to troubleshooting electrical issues saves time, money, and prevents potential hazards. To cite an instance, a circuit breaker that keeps tripping might signal an overload – you’ll need to spread electrical devices across different circuits.
Let us walk you through simple yet effective home electrical troubleshooting techniques that fix common power issues quickly. Note that safety should be your priority – unplug appliances to eliminate live electrical connections and reduce shock risks while you troubleshoot.
Start with the Basics: Is It the Device or the Power?
You need to know if the device or your home’s power supply is causing the problem. This difference helps you save time and avoid unnecessary repairs.
Check if the device is plugged in or faulty
Most electrical problems have surprisingly simple solutions. Here’s what you should do before complex troubleshooting:
- Make sure the device is properly plugged into the outlet
- Verify that the power switch is turned on
- Look at the power cord for visible damage or wear
- Check for burnt or loose connections at the plug
A burning smell or tingling sensation when you touch the device means you should unplug it right away. These signs point to potential fire hazards that need immediate attention. On top of that, make sure you haven’t plugged the device into a power outlet with mismatched voltage requirements.
Devices sometimes work occasionally instead of failing completely. This behavior often gives you clues about what’s wrong. An appliance that works only sometimes might have bad internal wiring or connections that only make contact in certain positions.
Test the outlet with another working device
After you’ve checked the device might be faulty, your next simple troubleshooting step involves testing the power source:
“Plug another working item into the outlet to determine if electricity is flowing”. This quick test shows whether your original device or the outlet is causing problems.
A working second device means your original appliance has issues. If the second device doesn’t work either, you likely have problems with the outlet or its circuit.
You might want to use specialized testing equipment for a deeper look:
- An outlet tester can identify common wiring problems
- A multimeter set to voltage range can measure if proper power is reaching the outlet
“If there is no voltage or reduced voltage, work back upstream”. This step-by-step method helps you find where the power flow stops.
Unplug appliances to isolate the issue
Circuit overloads often cause power problems rather than faulty outlets or devices. “Sometimes you can solve the problem by disconnecting a device from the circuit and flipping the breaker back on”.
Here’s how to check if overloading is your biggest problem:
- Find all devices connected to the problematic circuit
- Unplug unnecessary items one at a time
- Check if power returns after each removal
This elimination process works especially well for circuits that keep tripping their breakers. “If a circuit breaker keeps tripping, it might be overloaded. Consider redistributing electrical devices among different circuits”.
Unplugging appliances also makes your troubleshooting work safer. As a safety rule, “unplug small appliances when not in use and when cleaning or repairing them”. This step removes live electrical connections and reduces shock risks during your investigation.
Safety comes first in all these steps. Never touch exposed wires, work with wet hands, or try repairs beyond your expertise. “Always be careful while performing tests on a live outlet. When in doubt, ask a professional for help and advice”.
Check the Circuit: Breakers, Fuses, and Panels
Your home’s electrical hub needs a closer look if electrical problems continue after you check devices and outlets. Circuit breakers and fuses protect you from electrical hazards by shutting down circuits that detect dangerous conditions.
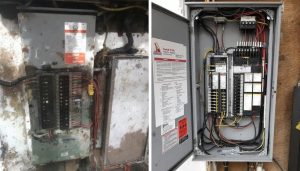
Locate and inspect your breaker box
A main electrical panel housed in a metal box with a door exists in most homes. You should start troubleshooting by finding it:
- Check common locations: garage, basement, utility room, or storage closet
- For apartments or townhouses, look in hallways, kitchen pantries, or utility closets
- In older homes, the panel might be mounted on an exterior wall
You might find your home has both a main panel and subpanels that control different areas. The panel door opens to reveal either rows of switches (circuit breakers) or round screw-in devices (fuses).
Circuit labels should exist on the panel, but these labels are often outdated or unclear. Each circuit manages a specific part of your home’s electrical system. Breakers typically come rated for 15 or 20 amps. The “15” breakers handle up to 1,800 watts (120 volts × 15 amps), though you should keep usage below 80% of this maximum to stay safe.
Reset tripped breakers safely
Your electrical system prevents damage through tripped breakers. Learning to reset them properly is vital:
- Look for the tripped breaker—it sits in the middle or “off” position, out of line with others
- Switch the breaker fully to the “off” position first
- Flip it back firmly to the “on” position until it clicks
You should unplug devices on that circuit before resetting any breaker to reduce the load. A breaker that resists resetting needs professional attention – never force it.
A breaker that keeps tripping points to a serious electrical issue. Power shutoffs from repeatedly tripped breakers clearly show an overloaded circuit.
Look for blown fuses or signs of overload
Older homes with fuse boxes need different troubleshooting than circuit breakers. Blown fuses need replacement instead of resetting.
Signs of a blown fuse include:
- Discoloration in the glass window
- Broken or melted metal strip inside
- Cloudy black or metallic residue in the fuse
The main power must be off before you replace any fuse. Use fuses with similar amperage ratings only—higher-rated fuses create fire hazards.
Circuit overloads show warning signs beyond tripped breakers:
- Dimming or flickering lights
- Buzzing sounds from outlets or switches
- Warm outlet covers or switch plates
- Burning smells near electrical components
These problems can become dangerous faster in older homes where wiring doesn’t meet modern needs. Call a professional electrician if issues continue after taking preventive steps.
Use a Step-by-Step Troubleshooting Method
Systematic electrical troubleshooting can save you hours of frustration and guesswork. Check your devices and inspect your electrical panel first. A methodical troubleshooting process will help you find problems quickly.
Understand the hopscotch method
Professional electricians use the hopscotch method to identify electrical faults. This simple technique helps determine the electrical status of components in a circuit as you follow electricity’s path.
Here’s how to use the hopscotch method:
- Attach one probe of your voltmeter to a common electrical point (typically the neutral wire or ground)
- Move the other probe around the circuit to test various points
- Compare voltage readings before and after components
The method relies on a simple principle: “If line voltage is read before a switch and after a switch, the switch is electrically closed. If line voltage is read before a switch and not after the switch, the switch is electrically open”. Testing each component systematically helps you spot what’s interrupting the electrical flow.
Follow the flow of current
Electrical troubleshooting relies on one key rule: “all currents return to their source.” Electricity flows in loops, and this knowledge helps track down problems systematically.
Tips for troubleshooting home electrical problems:
“Start by breaking the system down into the line, load, and control sides of the circuit”. This makes the process easier to handle. Start with the control side (like a thermostat or switch), then check the line side if needed.
Testing components in sequence along the circuit path prevents misidentifying problems. Failed upstream components affect everything downstream, so random testing might lead to replacing working parts unnecessarily.
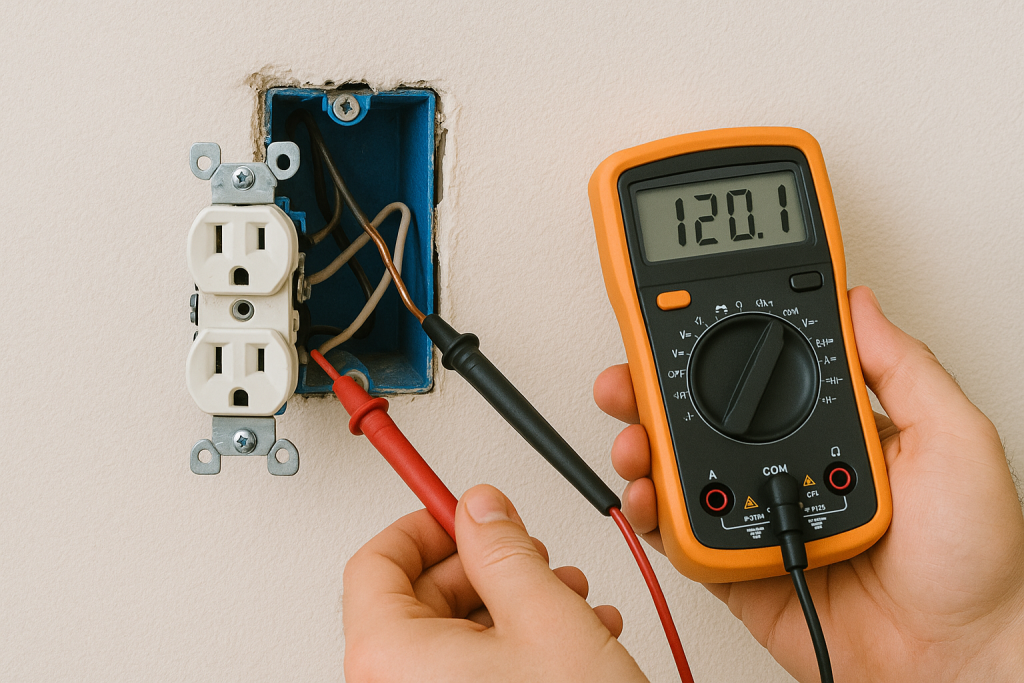
Use a multimeter to test voltage
A digital multimeter is essential for simple electrical troubleshooting. Here’s how to test voltage safely:
- Set the multimeter to measure AC voltage (typically marked as V~)
- Insert the red probe into the VΩmA port and black probe into the COM port
- For outlet testing, place the red probe in the smaller slot (hot) and black probe in the larger slot (neutral)
- Read the display – a working outlet should show 110-120 volts
Safety warning: “Hold both meter probes in the same hand so that a shock doesn’t pass through your body”. Never touch the metal parts of the probes while testing live circuits.
The multimeter’s continuity setting (usually shown by a sound wave symbol) tests switches and other components. Touch the probes to opposite ends – a beep means the component lets current flow through.
Refer to wiring diagrams if available
Wiring diagrams are a great way to get help with electrical troubleshooting. These diagrams show “what components are in a system, how components are wired, and the flow of current in a system”.
Ladder diagrams work best for home electrical troubleshooting because they “arrange the electrical components in an easy-to-read format”. This visual guide helps you understand how things work and where problems might occur.
Tips for using wiring diagrams:
- Trace the path from power source to load
- Identify components in sequence
- Match diagram symbols to physical components
- Note safety devices and protection components
Using wiring diagrams with the hopscotch method “should allow any technician to trace any electrical problems within a system”. Even simple diagram reading skills can help homeowners troubleshoot better.
These systematic troubleshooting methods help you find the exact cause of electrical problems quickly. This prevents unnecessary component replacements and saves time.
Identify the Type of Electrical Fault
Electrical faults show up in many forms. Each type has its own characteristics and needs different troubleshooting methods. A good repair strategy starts with simple checks and systematic testing to pinpoint the exact fault type.
Open circuits: how to test continuity
Open circuits happen when a break in the electrical path stops current from flowing through the complete circuit. Broken wires, loose connections, or damaged components usually cause these interruptions.
To test for an open circuit:
- Set your multimeter to continuity mode (usually indicated by a sound wave symbol)
- Make sure the circuit is powered off and disconnected
- Touch the probes to opposite ends of the component you’re testing
A continuous beep shows a complete path, while silence means an open circuit. Note that “continuity is the presence of a complete path for current flow. A closed switch that is operational, for example, has continuity”.
Short circuits: signs and testing
Short circuits occur when current finds an unexpected path of lower resistance and bypasses the normal circuit route. Watch for these warning signs:
- Circuit breakers trip right after you reset them
- Buzzing or popping sounds from circuit activation
- Burnt smells or visible melting near outlets or switches
Electricians say that “By resolving the short circuit as soon as possible you’ll reduce the likelihood of deteriorating wire and its insulation, and prevent the breaker from causing a fire”.
Your multimeter set to resistance mode can test for shorts. A short circuit often shows up as unusually low resistance readings where current takes a different path.
Overamping: using a clamp meter
Overamping happens when a circuit pulls more current than it should handle. Testing for overamping needs live circuit measurement, unlike continuity or shorts tests.
A clamp meter offers the safest way to test. These devices “detect the magnetic field emitted by current flowing in a wire in order to measure the current value” without cutting into the circuit. Here’s how:
- Set the clamp meter to measure AC amperage
- Open the jaws and place them around a single wire (never multiple wires)
- Read the current measurement and compare to the circuit’s rating
Ground faults and safety risks
Ground faults rank among the most dangerous electrical problems. Current strays from its intended path and flows straight to ground. Research shows that “98% of all electrical faults are ground faults”, making them very common.
Damaged insulation, moisture exposure, or equipment failure typically causes these faults. Bathrooms and kitchens pose higher risks because “water is conductive and exposes degradation of insulation”.
Ground fault protection systems play a vital safety role. They “detect and interrupt ground faults that pose risks such as electrical shocks and fires”. These faults can cause severe electric shock, burns, or electrical fires without proper protection.
Finding the specific type of electrical fault solves half the problem in simple electrical troubleshooting. Knowing when to call a professional for help matters just as much.
Test Key Components: Switches, Capacitors, and Motors
After identifying the electrical fault type, you’ll need to test specific components to find exact failures. This targeted testing helps you figure out which parts need your attention.
How to test a light switch with a multimeter
Light switches break down often, but testing them with a multimeter in continuity mode is straightforward:
- Turn off power at the breaker and verify with a voltage tester
- Set your multimeter to continuity (sound wave symbol) or resistance/ohms
- Remove the switch from the wall and disconnect wires (label them first)
- Touch one probe to each screw terminal
- Flip the switch between positions
Your multimeter should beep (or show near-zero resistance) when single-pole switches are ON and show no continuity (infinite resistance) when OFF. You need to test three-way switches by checking the common (dark-colored) terminal against each traveler terminal separately – you’ll get continuity in one position but not both.
Check single and dual run capacitors
Motors and HVAC systems often fail because of faulty capacitors that store electrical charge:
- Disconnect all power and verify with a voltage tester
- Safely discharge the capacitor using an insulated screwdriver across terminals
- Set multimeter to capacitance mode (μF or MFD)
- Test between appropriate terminals
Single run capacitors have two terminals while dual run capacitors have three (marked C, HERM, and FAN). A working capacitor should read within 5-10% of its rated microfarad value. You can spot a failed capacitor that needs replacement by looking for bulging, leaking, or burnt spots.
Identify a seized motor
Bearing issues or electrical winding problems usually cause motor failures:
- Test manually by rotating the motor shaft/pulley by hand
- Listen for grinding, scraping or knocking sounds that signal bad bearings
- Feel for resistance or stiffness while turning that points to bearing failure
- Check winding resistance with a multimeter set to ohms
A good motor turns smoothly without much resistance. Shorted windings show zero resistance readings, while open windings give very high readings.
When to replace vs. repair
Here’s what should guide your replacement decisions:
- Switches: Replace if continuity tests fail or if you see visible damage
- Capacitors: Replace any out-of-tolerance units since repairs aren’t possible
- Motors: Replace those with severe overheating damage, failed resistance tests, or locked rotors
The component’s age, replacement cost, and safety risks should shape your decision. Newer devices with minor issues might be worth fixing, while older parts with critical failures usually need replacement.
Conclusion
Final Thoughts: Safety First in Electrical Troubleshooting
Simple electrical troubleshooting skills equip you to handle common household power issues. This piece has taught you to identify problems systematically – from simple device checks to complex component testing. Your DIY skills matter, but knowing your limits matters just as much.
Safety comes first with electrical systems. Make sure the power is off at the breaker before you start any troubleshooting. A voltage tester should confirm this. On top of that, watch for warning signs that need professional help – burning smells, melted wires, or breakers that keep tripping.
Electrical troubleshooting works through a logical process of elimination. You can solve many electrical problems without expensive service calls by testing outlets, checking circuit breakers, and analyzing specific components methodically. Complex problems with main panels, persistent ground faults, or outdated wiring systems need professional expertise.
The hopscotch method and component-specific tests will be valuable additions to your DIY toolkit. These skills can save you time and money while helping maintain a safer home electrical system. Your family’s safety must be the top priority – a licensed electrician should handle any electrical problem you’re not completely confident about fixing.