Wondering how to install a ceiling fan without existing wiring in your home? A standard ceiling fan installation costs between $145 and $355, but the project gets more complex and expensive when there’s no wiring. The costs can jump from $300 to $800 and might reach $2,000 for a complete installation.
Ceiling fans are a great way to get benefits that make the investment worthwhile. You can save money on energy costs by cutting down your air conditioning needs during summer months. The installation isn’t your typical DIY project though. These fans weigh between 15 and 50 pounds and need secure mounting to ceiling joists. The electrical work needs careful planning and safety measures. This piece will guide you through everything – from local building codes to final connections – whether you plan to do it yourself or hire a pro.
Planning the Installation
You need to plan carefully before grabbing any tools to install a ceiling fan where no wiring exists. This groundwork will give you both safety and functionality in your new addition.
1. Why install a ceiling fan without wiring?
Rooms without existing wiring can benefit greatly from ceiling fans. These fans will cut down your energy costs by reducing your dependence on air conditioning during summer months. They also make your home comfortable all year round. The fan pushes warm air down in winter and creates cool breezes in summer.
Ceiling fans become part of your room’s design, unlike portable fans that eat up floor space. They also distribute air more effectively. Many homeowners find the work to be done worthwhile because of better comfort and lower energy bills, even without existing electrical connections.
2. Choosing the right room and fan location
The center of the room works best to place your ceiling fan, which helps distribute airflow evenly. This spot balances air movement throughout the space and prevents concentrated drafts or dead zones.
The quickest way to get the best performance is to follow these guidelines:
- Install the fan at least 7 feet above the floor and 18 inches from walls
- Mount 8-9 feet above the floor when ceiling height allows for best airflow
- Pick fan size based on room dimensions (29-36″ for rooms up to 75 ft², 36-42″ for 76-144 ft², 44″ for 144-225 ft², and 50-54″ for 225-400 ft²)
Look for nearby power sources since you’ll need to run new wiring before settling on a location. A stud finder will help locate ceiling joists, as fans weighing 15-50 pounds need secure mounting to these supports.
3. Understanding local building codes and permits
New electrical work means you’ll need permits in most areas to install a ceiling fan without existing wiring. While replacing an old fan might not need a permit, adding new wiring or upgrading an electrical box usually does.
Your installation must meet the National Electrical Code (NEC) requirements through permits. The code requires ceiling fans to mount to fan-rated electrical boxes that can handle their weight and movement.
Skipping permits might seem like a time-saver but could cause problems during home sales, insurance claims, or electrical issues. Your insurance might also reject claims related to unpermitted wiring.
Tools and Materials You’ll Need
You’ll need the right supplies to install a ceiling fan where there’s no existing wiring. Let’s look at the tools and materials that make the job safe and functional.
1. Safety gear and electrical tools
Safety should be your top priority when dealing with electricity. Here’s the protective gear you’ll need:
- Insulated gloves and safety glasses
- Non-contact voltage tester that checks if power is off
- A sturdy ladder that lets you reach your ceiling easily
The electrical work requires these tools:
- Wire strippers and needle-nose pliers
- Electric drill with various bits
- Stud finder to spot ceiling joists
- Fish tape or rod that pulls wires through walls and ceilings
- Multimeter to test connections
2. Ceiling fan-rated electrical box
Each electrical box serves a different purpose. Your ceiling fan needs:
- A fan-rated junction box that handles the weight and movement of ceiling fans
- Boxes with “For Fan Support” or similar labels
- Braced boxes mounted between joists if direct joist attachment isn’t possible
These special boxes usually cost $10-$25 based on their style and how they mount.
3. Wiring supplies and mounting hardware
The electrical parts you’ll need are:
- 14/2 or 12/2 electrical cable that matches your home’s wiring
- Wire nuts to connect wires safely
- Electrical tape
- Cable staples that keep wiring secure
- Junction boxes to link existing power sources
The mounting needs:
- Mounting bracket (your fan should come with this)
- Screws that work with your ceiling type
- Drywall saw if you need access holes
4. Optional: remote control or wall switch
The control options are worth thinking about:
- Wall switches run $15-$30 and need extra wiring to the switch spot
- Remote controls ($25-$75) install easier since the receiver fits in the fan canopy
- Smart controllers ($50-$100) let you use apps and connect to your smart home
A quick chat with a licensed electrician might be worth it if you’re unsure about any electrical work. Your safety comes first.
Step-by-Step Installation Process
A ceiling fan installation without existing wiring becomes simple when you break it down into manageable steps. Let me walk you through each phase of this process.
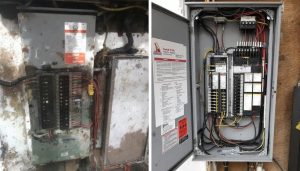
1. Turn off power at the breaker
Your home’s circuit breaker box needs to be located first. Shut off power to your work area. This step is non-negotiable for safety. A voltage tester should verify the power is off by checking nearby outlets or fixtures. Wall switches alone aren’t reliable enough—ceiling areas might have multiple power sources.
2. Mark and cut the ceiling opening
Pick your fan location and grab a stud finder to spot ceiling joists. Draw the outline of your electrical box on the ceiling—it’s usually 4 inches across. A drywall saw will help you cut a clean hole between joists along this outline.
3. Install the fan-rated electrical box
The ceiling needs a fan-rated electrical box that supports at least 50 pounds. You can choose between two methods:
- Direct mounting to a joist using screws
- Using a brace kit that spans between two joists
Each method must provide secure mounting that handles the fan’s weight and movement.
4. Run new wiring from power source
The electrical cable needs to run from your nearest power source to the new fan location. The process involves:
- Running 14/2 wire from your service panel to a wall switch
- Running 14/3 wire from the switch to the fan box
- Securing wires properly throughout their path
5. Connect wires and mount the fan
Once the wiring path is ready, make these electrical connections:
- Black wire to black (hot)
- White wire to white (neutral)
- Green or bare copper to green (ground)
The mounting bracket goes on next. Connect the fan motor and install the blades according to your manufacturer’s instructions.
6. Install switch or remote control
You can control your fan with either a wall switch or remote receiver. Remote receivers fit into the space above the fan’s downrod. Match and connect the fan’s wires to the remote using corresponding colors. Add batteries and test everything works properly.
Safety Tips and When to Call a Pro
DIY projects bring satisfaction, but electrical work needs careful thought. Your safety should come first when you want to install a ceiling fan where no wiring exists.
1. Risks of DIY electrical work
Many homeowners don’t realize how dangerous electrical installations can be. The risks multiply quickly if you lack experience with electrical systems:
- You might get electrocuted even when you believe the power is off
- Bad wiring could start electrical fires
- Your ceiling might get damaged if the fan isn’t supported right
- You could fall while trying to balance on ladders with heavy equipment
Bad installations often create wobbling fans that might break free from their mounts. This puts both people and property at risk.
2. Signs you need an electrician
You should ask a professional electrician if:
New wiring needs to run from the electrical panelYour home’s electrical system is old and needs updatesYou have high ceilings or tough spots to reachThe local building codes confuse you
Your homeowner’s insurance probably won’t pay for damage from DIY electrical work.
3. How much to install a ceiling fan without existing wiring
A ceiling fan installation without current wiring costs $300-$800 typically. The price changes based on how hard the wiring is and how far it sits from the main electrical panel. Older homes might need a new circuit – this is a big deal as it means that costs could hit $1,000 or more.
4. Ensuring code compliance in Glendora, La Verne, and San Dimas
Glendora, La Verne, and San Dimas require all electrical work to meet National Electrical Code standards. The rules say you must:
Ground all ceiling fans properlyUse fan-rated electrical boxes that can support the weightGet permits before installing new wiring
Work without permits can fail home inspections. Insurance companies might reject claims, and safety risks increase.
Conclusion
Adding a ceiling fan without existing wiring has its challenges, but the benefits make it worth the effort for many homeowners. These fixtures provide comfort all year and can cut your energy bills by hundreds of dollars each year.
Your safety should be the top priority during installation. Most homeowners are better off hiring a professional electrician unless they have solid electrical experience. Professional installation costs between $300-$800. This investment keeps you safe from electrical hazards and will give a code-compliant installation.
DIY homeowners can handle this project if they stick to safety protocols and know the electrical basics. Incorrect installations are dangerous. They can lead to injuries, fire risks and problems with your home’s insurance coverage.
Smart planning helps avoid mistakes that can get pricey. Pick the right spot and fan size for your room. Get the needed permits for Glendora, La Verne, or San Dimas. Use quality materials, especially a fan-rated junction box that can handle your ceiling fan’s weight and motion.
Ceiling fans are valuable upgrades for most homes. The installation needs extra work and money when there’s no existing wiring. But your investment pays off through energy savings and better comfort as seasons change.